Tuesday, December 31, 2013

BBQ Pineapple Meatballs

This year for Christmas Eve I was put in charge of meatballs for the family gathering. BIG responsibility. If the meatballs aren't perfect, Christmas is ruined. OK, not really, but the Seitz family loves their balls.

I'm not a big fan of Swedish meatballs, which I think is what is normally made for our Christmas Eve gathering. I figured, its 78 degrees outside, lets get tropical, yo. Here is what you will need for your "Tropical Christmas Eve" meatballs:


WOW! Only 3 ingredients!? Its a Christmas miracle! 

I was able to fit 1 1/2 bags of meatballs in my crock pot. I used a whole bottle of bbq sauce and a can of pineapple chunks. I cut the pineapple chunks a little smaller.

I placed the meatballs in the crock pot, covered them with the sauce, then added the pineapple. I mixed it to make sure the meatballs were completely covered. 

There you go, rocket science. 

I cooked them on low for 4 hours. 


I got a million compliments on my meatballs. Literally. Like to the point where it was like, "OK, people, I get it."

Super easy. Super yummy. Super super.

Sunday, December 8, 2013

Avocado Cream Cheese Won Tons

Since I just posted my Sun dried Avocado Egg Rolls, I thought I would post these yummy won tons that I love to make. 

Here is what you will need:

Avocado
Cream Cheese 
Chives 
Won Ton wrappers


Before you start preparing, heat one inch of oil in a skillet on medium. 

Now start chopping those onions! 


Chop the avocado into chunks 


Now take a wrapper and lay it flat. Add a "dollop" of cream cheese. Then add the avocado and chives. 


Now for the folding. There are many ways to fold a won ton. You don't need to be fancy, you just need to make sure it is sealed so nothing comes out when you fry it. You will need a small dish of water for folding. Here is how I do it. Fold it into a triangle and wet the edges so it sticks together.


Fold the left side up and use water to seal it


Fold the right side up and use water to seal it


Perfect! Now its time to fry these babies! "Gently" put won tons in the pan. You don't want to splash yourself.... it hurts! I let them fry for 30 seconds to 1 minute on each side or until golden brown.


Yum! When they are done frying put them on a paper towel for a min or two. This gets any extra oil off and allows them to cool. Trust me, you don't want to bite into a hot won ton unless you want blisters on the roof of your mouth. I know this all too well! 


I like my won tons with sweet and sour sauce and the sauce I use for my egg rolls. You'll just have to read my blog about my egg rolls to see what sauce that is ;)

Saturday, December 7, 2013

Sun Dried Tomato Avocado Egg rolls

These are soooo YUM! I was trying to copy the egg rolls at The Cheesecake Factory and came up with these. Really simple to make, doesn't take too long, and no calories or fat!..... ok, that last part isn't true.

Here is what you will need:

salt (to taste)
pepper (to taste)
sun dried tomatoes 
egg roll wraps 
chives
avocado (each avocado makes 4 egg rolls)


Before you start preparing anything, heat about 1 inch of oil in a skillet on medium.
 Cut onions. We LOVE onions in our house so I added a lot to our egg rolls.


I sliced my avocado long ways while it was still in the peel.... skin... whatever that part of the avocado is called... then i scooped it out with a spoon. I then cut it again. Add salt and pepper to taste.


Lay egg roll wrapper flat and add avocado

 
 Then add the chives 


 Lastly, add the sun dried tomatoes, as many as you like.


 Now its time to fold the egg roll. I'm not fancy so here is how I do it:

Fold the right side over


 Fold bottom over


Fold left side over 


Then roll it all the way. To get the end to stick and close shut you have to wet the very end of the wrapper with just a small amount of water all the way across. I didn't take a picture of this step (I know, I fail) but I promise you its not hard. 

Your skillet should be more than ready now. Be careful not to splash oil on yourself when putting the egg rolls in the pan. 


Cook on both sides for about two minutes or until golden brown. 


Be careful when taking them out. They are extremely hot!

I cut them in half to help them cool down faster. 

This is the sauce I use 


Its technically a salad dressing but can be used as a dipping sauce and oh my goodness its amazing! 

Here is the finished product 


Beautiful, eh?


Wednesday, December 4, 2013

Vanilla Olive Oil Sugar Scrub

I made this today to give as Christmas gifts. It was super easy. Took me about 10 min. 

Here is what you will need: 

1/2 cup granulated (white) sugar
2 cups sugar in the raw
1 tbsp honey
1/2 cup extra virgin olive oil
1 tbsp Vanilla extract (or your favorite essential oil)
Cute jars to put scrub in


Here's what to do: 
Combine the two sugars in a bowl and mix. 


Add olive oil and stir


 Mix in the honey and vanilla.


Stir! 


Store in an airtight jar and enjoy!


See, that was easy!

 This is a very coarse scrub. If you would like a more gentle scrub you can substitute brown sugar for the sugar in the raw. Oil will settle in the jar so stir before using. I do not recommend using this scrub on your face. It is intended for use on the body only.

This recipe filled 3 8oz jars 

Friday, November 29, 2013

Chunky Taters

I don't know about you, but I prefer my mashed potatoes to be chunky, not the consistency of baby food. I never really make mashed potatoes but when I recently did, my husband loved them.

Here is what you will need:

Yellow potatoes  (7 was more than enough for my family of 4 and we had leftovers)
Pepper to taste
Garlic Salt to taste
Grated Parmesan cheese to taste (Not the fancy fresh stuff, the ghetto stuff in the can cause that's how I roll)
1/4 milk (any kind)
6 tablespoons of butter (Does that sound like too much butter to you? Then you need to leave this page immediately)


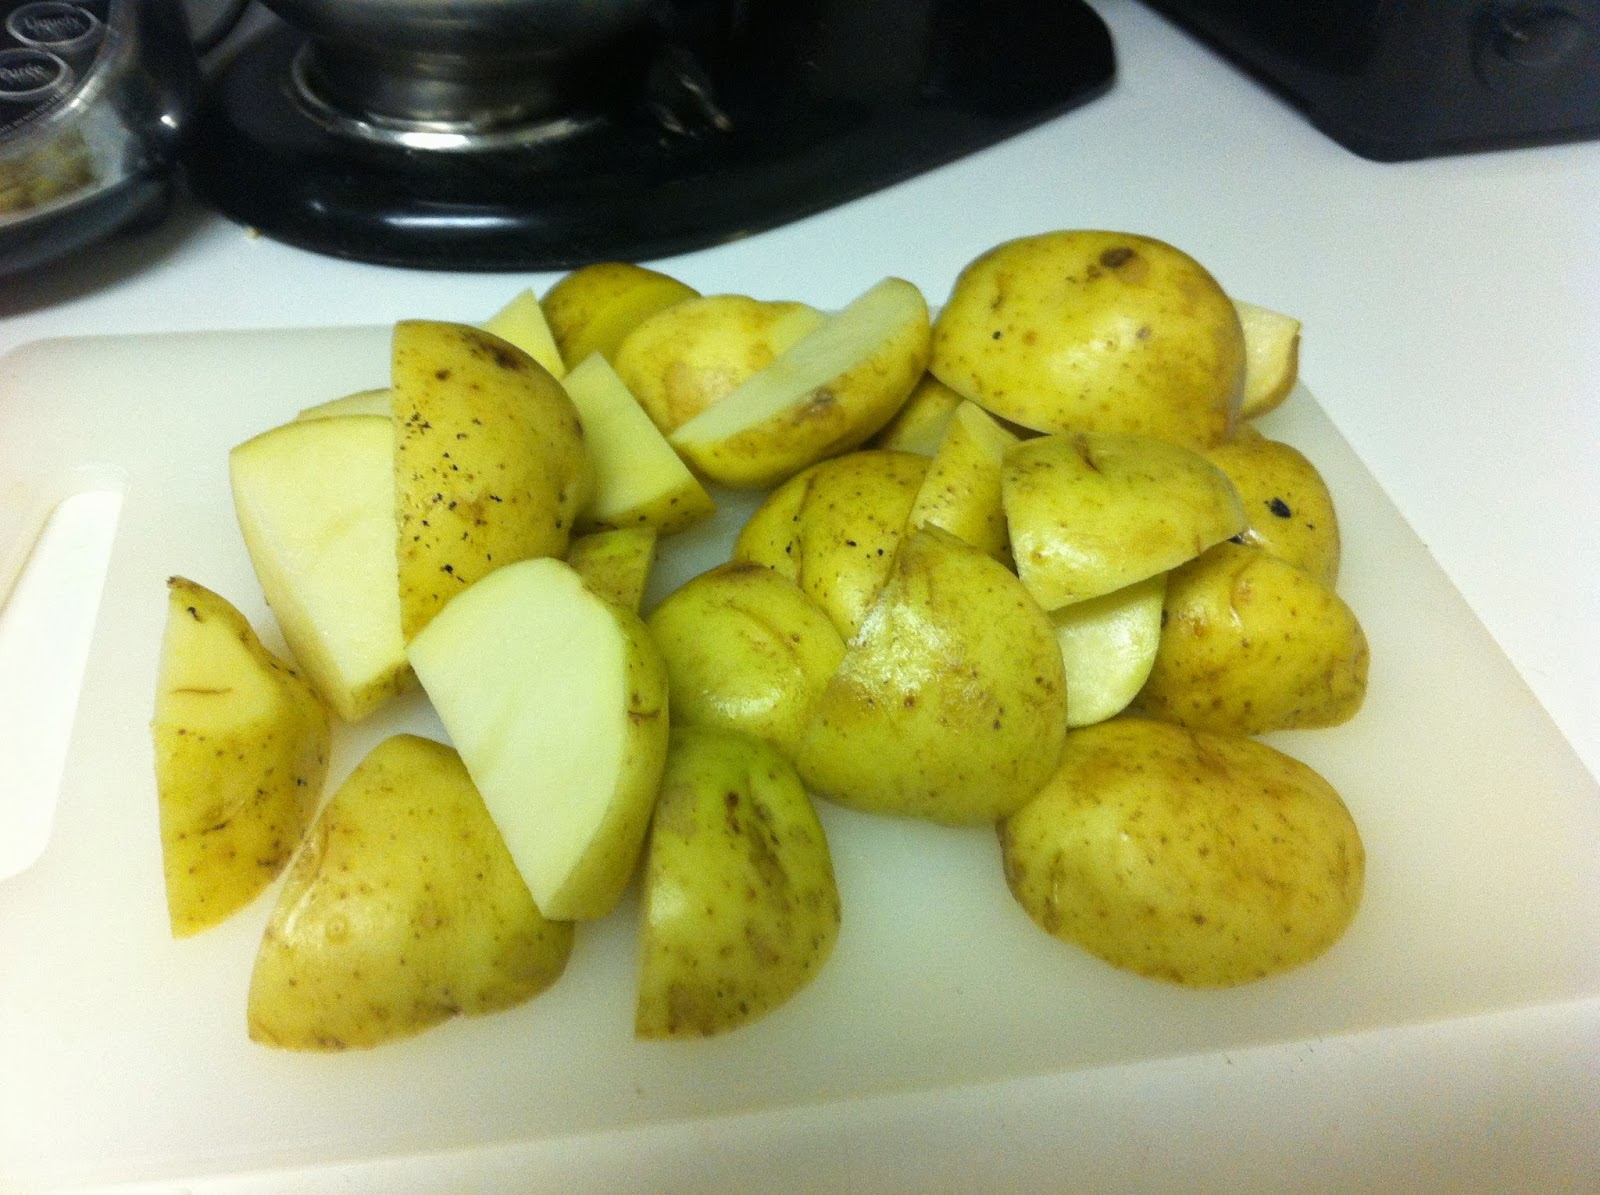
Awe. Look at the beautiful golden taters. Rinse them off and don't worry about not getting ALL of the dirt off. I believe a famous philanthropists once said "God made dirt and dirt don't hurt."  Okay people, time to chop those potatoes. Legend has it, they cook faster when you do this. 


All chopped. Good job. And for those of you who are worried about the potatoes, don't worry, they didn't feel a thing.

Boil the potatoes in water until you can "stick a fork in it." Then add pepper, garlic salt, parmesan cheese, milk, and butter. 

I like to mash with a whisk instead of a potato masher. That way I will still have chunks of potatoes. 


You may need to add a little more milk. 
This is the time where you get to taste test your taters. Try saying that 17 times. 
Its hard to write down recipes for some of the food I make because it all depends on how much seasoning one likes. So try your taters and decide if you need to add more of something. 
Side Note: you can never add too much cheese! 


Here is my finished product. Its times like these I wish I had a fancy camera and amazing lighting, but I don't. These are super yummy, easy to make, and of course, cheap! 


Psssst! If you like this post, follow my blog! I have no shame.... 

Monday, November 25, 2013

Breakfast Biscuits

I grew up eating these biscuits. My father would make them on the weekends and it was almost impossible to wait for them to finish baking in the toaster oven. 

Here is what you will need:

3 cups flour
1 tbsp sugar 
1 tbsp baking powder 
1 tsp salt
3/4 tsp cream of tartar 
3/4 c butter 
1 c milk 

 
Preheat oven to 450. 
Mix all dry ingredients in a bowl. 
Cut the butter into the dry ingredients. I use either two knives or two forks. I didn't grow up with the "fancy" kitchen tool that should probably be used for this step so I still do it old school. Cut until mixture resembles crumbles. 

 Make a well in the center of the mixture. Add milk and stir with a fork just until moistened. 
Sometimes I have to a add a dash of milk more. Use a fork and stir until mixture is moistened.


Lightly flour a surface and turn dough out onto it. knead the dough and pat or roll out. 


Use any kind of cutter you want. I think my dad always used a shot glass. I use little containers that I have for condiments. Cut out your biscuits. 


Look at the beautiful angle of this picture. Who needs a fancy camera when you have and iPhone? 

Place biscuits on an ungreased baking sheet and bake for 12 min or until golden brown. 


BAM! Golden. 

Here's the part I always liked as a kid. We would get all the goodies out of the fridge to top our biscuits. Honey, butter, jams and jellies. I'm a lover of Knott's Boysenberry jam.

 
This is super cheap, easy, and fast which is always what I look for in a recipe.

ENJOY!


Monday, November 18, 2013

Easy Apple Pie for the baking challenged

Apple Pie is my favorite and its super easy to make. But I know of some friends that are "baking challenged" so I decided to put this super easy recipe on my blog for those who need a little help. Here is what you will need:

7-9 granny smith apples
3/4 cup sugar 
2 tbsp flour
1/2 tsp cinnamon
1/8 tsp nutmeg 
1 tsp vanilla 
addition 2 tbsp sugar 
1 tsp cinnamon 
1 cap full of milk 
Pre made pie crust (im a cheater. I cant make my own crust. Aint nobody got time for that!) 


Aren't the apples pretty!? I love green. Lets just take a moment to look at them..... OK, moment over.

Peel all the apples. I peel them into the bag the apples came in.


Naked apples! 
 

I then cut the apples into thin slices. I prefer thin slices over chunks but you can do what you want. 


Put all the apples slices into a large bowl. Add sugar, flour, cinnamon (1/2 tsp), nutmeg, and vanilla. The recipe I have always used doesn't call for vanilla but I tried it with this pie and loved it. Gently toss together until coated. 


Now for the tricky part. Open pie crust box and remove crust. 


Hard part over. You did great. 

Place one crust in bottom of pie dish. 


Place apple filling is dish. 


Cover with second pie crust and carve a big S in it for Seitz.... or what ever design u want to do. But at least poke a few holes in the crust so the pie can "breath".


Mix 2 tbsp of sugar and 1 tsp of cinnamon. Take the cap from your milk and fill it with milk. If your milk doesnt have a cap then measure about 2 tsp of milk. Cover pie crust with the milk then sprinkle with the cinnamon and sugar mix. 


-


Place foil around the outside of the pie. This will keep the edges of the pie from burning. 


Bake pie at 375 for 40 min. Take the foil off and bake for an additional 20 min. 

Let pie cool for an hour. 


DElicious! 

Try not to eat the whole pie in one sitting!